Inventory Auto Upload
About Inventory Upload Automation:
Uploading inventory to WarehouseTWO not only gives other wholesale-distributors visibility to a company’s inventory but allows for companies to expand their sales territory. WarehouseTWO members with a level 2 account or higher, can create an account to use the WarehouseTWO FTP Server to set up an automated inventory upload. Automated inventory data posting ensures higher reliability, consistent updates, and better item placement in search results (sorted by part number and posting date). It also reduces labor by requiring no additional work once set up.
How to Search:
Step 1 - Setting Up an FTP Account
- In step 5 of registering a premium WarehouseTWO account (level 2 or higher), check the “Request FTP Access” box.

- Account Administrators will have access to the assigned FTP Username and FTP Password under the membership information under the Account Settings.

Step 2 - Downloading and Installing “WinSCP”
-
To upload your company’s inventory data file to WarehouseTWO’s FTP server, a secure connection using the FTPS (Explicit) protocol is required.
- WinSCP is a free, open-source SFTP, SCP, FTPS, and FTP client for Windows, designed for transferring files between a local and remote computer. It also provides scripting and basic file management features. This application is recommended for its security, open-source nature, and no-cost availability.
-
Click here to download the WinSCP application.
-
Users may be required to unzip the file.
-
Install the file to a folder labeled “winscp”.
-
Once the download is complete, two applications will be installed:
-
“WinSCP.exe” - graphical user interface, “GUI”, version.
- Any shortcut created during the installation process will likely link to the GUI version.
-
“WinSCP.com” - DOS-like command line entry interface version
-
-
Step 3 - Testing the Data File, Internet Connection, and FTP Account
-
Before automating the inventory data file transfer, ensure that the inventory data file is correctly formatted, your PC/server is connected to the internet, and your FTP account information is valid.
-
Log in with an administrative user account and manually upload a test inventory data file to your account using the “+Upload” tab in WarehouseTWO.
- Users may want to consider deleting any items previously posted to their inventory prior to manually uploading the test file.
- Once the test file uploads successfully, delete all inventory that has been posted.
-
Manually connect to the WarehouseTWO FTP server using WinSCP and upload a test inventory data file.
- Open the WinSCP.exe application, and the “Session” window will appear:
-
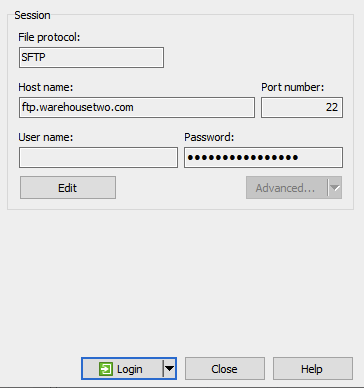
- For the File protocol, select “SFTP”
- In the Host name field, enter “ftp.warehousetwo.com”.
- For the User name and Password, enter the WarehouseTWO FTP account information.
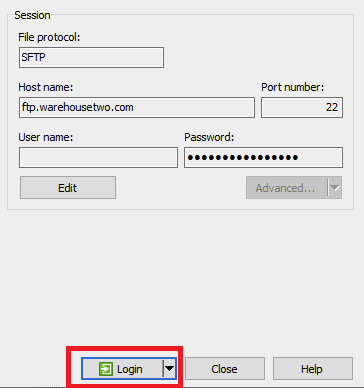
- When the fields have been completed with the correct information, the “Login” button will become active:
- Once the FTP connection is successfully established, the WinSCP control panel will appear:

-
The directory on the left represents the PC/server, while the directory on the right represents the sub-directory on the WarehouseTWO FTP server assigned to the account.
-
Use the on-screen tools to navigate through your PC/server files until you find your inventory data test file. Then, drag the file to any location in the right-hand directory.
-
Close the WinSCP control panel.
- The transferred file will be processed and deleted from your account’s sub-directory on the WarehouseTWO FTP server within ten minutes.
- After ten minutes, log into the WarehouseTWO website to confirm the file was uploaded successfully.
-
-
Step 4 - Creating the Transfer Script
-
The automated file transfer process requires creating a script file and saving it on the PC/server that will handle the daily file transfers
-
Use the Notepad application to create a script file
-
It is recommended that the file name does not include spaces or any special characters.
- The file extension must be “.txt” and contain the following:
option batch abortoption confirm offopen sftp://<username>:<password>@ftp.warehousetwo.comlcd C:\<path\folder>put *.*closeexit- In your script file, replace
with your assigned FTP username and with your assigned FTP password. - Replace the text c:<path\folder> with the directory path to where your inventory data file will reside on your PC/server.
Step 5 - Creating and Testing the File Transfer Scheduled Task
-
To schedule the script, use the Windows’ “Task Scheduler,” which should already be installed on your PC/server.
-
From the Start menu on your PC/server, go to the Control Panel -> System and Security -> select “Administrative Tools”.
- In the Administrative Tools folder, double-click the “Task Scheduler” icon/shortcut and the Task Scheduler application window will open.
-
On the right-hand panel of the Task Scheduler application window, select “Create Basic Task”:
-

- When creating a basic task, enter a Name and Description (optional), then select “Next”:

-
Under Trigger select Daily -> “Next”.
-
On the Daily tab, accept the default start date and desired start time.
-
Schedule the file transfer to occur anytime between 02:10 GMT (9:10 PM EST or 10:10 PM EDT) and 06:50 GMT (1:50 AM EST or 2:50 AM EDT) everyday.
-
Posting during this window ensures that your data is displayed with the current date throughout the next business day. This helps items rank higher in search results and increases their credibility with potential buyers.
- WarehouseTWO members who export inventory data for importing into their ERP systems just before North American business hours will receive your most up-to-date information.
-
-
-
On the Action tab, accept the default selection, then select the Start a Program tab -> “Next”.
-
In the Program/scripts field, enter “winscp”.
-
In the Add Arguments (optional) field, enter the following text string as one line with no carriage return:
/console/script="C:\<path\folder>\<script_name>"/log="C:\<path\folder>\wtwo_upload_log.txt-
In the above text string, replace C:\path\folder> with the directory path where the script file resides
- A log file named wtwo_upload_log.txt will be created in this same folder, and appended each time your task runs.
-
Replace <script_name> with the name of the transfer script file.
-
-
In the Start in (optional) field, enter the following text string as one line and select “Next”:
C:\Program Files\winscp- The above string assumes WinSCP is installed in a “winscp” folder under Program Files on the C: drive. If not, edit the path to reflect the correct location of the WinSCP application
.
- The above string assumes WinSCP is installed in a “winscp” folder under Program Files on the C: drive. If not, edit the path to reflect the correct location of the WinSCP application
-
-

-
In the Finish tab, select “Finish”.
-
To verify your task and script, delete all inventory data from your account.
- In Task Scheduler, select “Task Scheduler Library” in the left pane, select your task in the center, and then select “Run” in the right pane.
- A small black window will open, display scrolling lines of text, and then close.
- Depending on your user rights on your PC/server, you may be able to view the history pane, which will show if the task was completed successfully.
- After ten minutes, log into the WarehouseTWO web site and verify that the file was uploaded successfully.
